投稿

2017の投稿を表示しています

TAMIYA LACQUER PAINT タミヤ ラッカー ペイント

イメージ
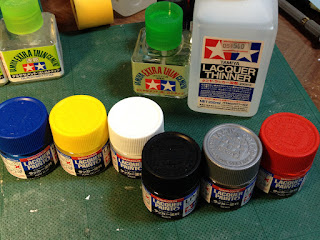
I love to use FAST DRY paint ,like GSI CREOS's Mr.Color. That means I do not prefer to use water soluble acrylic paint. They are too slow to dry up, and they have not enough opacity. Here, Tamiya released their first bottled lacquer paints. Solvent is already released and I got those yesterday.  ラッカー塗料の乾燥の速さが気に入っていたのですが、 水性アクリルの使いにくさには手を焼いていました。 タミヤさんからリリースされたラッカーペイント、 早速使ってみました。 Tamiya Lacquer...ummm, they are not bad. But not so superior to the Mr.color. Opacity of Tamiya's white (LP-2)is not enough. I would rather prefer Gaia's Ultimate White. Other colours are not bad.Dries quick.That's good point. Silver of Tamiya Lacquer is excellent!! You have to use it. That shines like Pactra Tamiya's Chrome Silver! タミヤラッカーですが・・・まあまあってところです。LP-2の ホワイトは、隠蔽力が低くイマイチでした。 ガイアのアルティメットホワイトが自分のイチオシです。 他の色はまあそれなり。乾燥は早いです。 ・・・シルバーがいいです!素晴らしい。昔のパクトラタミヤの クロームシルバーの輝きです。筆塗りでコレです。

Hasegawa F-4J (1)

イメージ
I've learned that Hasegawa's 48th scale Phantoms are great. Now I have bought a second hand F-4J. This is the classic Hasegawa's original 1:48 F-4 kit. ハセガワ48ファントムの良さに惚れ込みました。中古のF-4Jを買いました。 オリジナルの奴です。 What a beautiful box art!  I love this nice sea blue and mighty Phantom. ボックスアートにとにかく惹かれます。すばらしい! Some completed model pictures are on the side of the box. この頃は完成写真が箱側面にあります。 Decals are tinted but seems to be OK to use. デカールは黄ばんでます・・でもなんとなく使えそう。 Instruction of 1980's Hasegawa model kit. 80年代の典型的なハセガワ組立説明書です。 Pretty nice price to buy this one. I think this is for the box art. この価格は箱絵の値段だと思っています。 Allready on constructing. Using PE parts from recent British Phantom's kit. 実はすでに作り始めています。先のブリティッシュファントムについていた エッチングパーツを使っています。 Raised panel lines! All of modelers hate the raised panel lines BUT  I think this is the legendary kit. I will build this kit as it is.  凸パネルラインですが、このまま作ろうかと思います。

The British Phantom FG Mk.I        6(Finished)

イメージ
I've finished working with the British Phantom FG1. 48th scale Phantom is pretty nice to handle. Now I want more and more 48th scale Phantoms. 1/48ブリティッシュファントムできました。 サイズ感が良く、手頃なのでもっとファントムの数を 増やしたいです。 I love to pilots to be seated on their own seats. 搭乗員を乗せた状態で作るのが好みです。  Nose gear extended for take off. 発艦状態なので前脚は伸ばしています。  Flaps are downed. Their structures are pretty complicated and I'm not syre about those real shapes. This is just what  I like to build and show. 下ろした前後フラップの形状の詳細は不明のままなので、制作した 内容はあくまで好き勝手に作ったままのものです。  You can see the face of observor. 後席乗員は顔が分かります。 OK, next. とりあえず、次行きましょう。

The British Phantom FG Mk.I        5

イメージ
I love the 892NAS scheme Phantom but there were no decals  for 892NAS in RAM Model decal. I had to make them myself using masking tape.  892航空隊のカラースキームが好きなんですがRAMモデル デカールには含まれていないのでマスキングテープでそれらしく 描いていきます。 Now that's the 892 Phantom! Look at the bright red tail markings! 垂直尾翼に赤いマーキングが入ったことでようやく締まります。  I need an aviator and a navigator. パイロットと航法士も必要です。 Now the walk way is ready.   背のところの滑り止め(?)もマスキングです。

The British Phantom FG Mk.I 4

イメージ
Phantom has been painted all over the upperside with Extra Dark Sea Grey. Yes! this is the penguin coloured FAA Phantom. ペンギンカラーになりました。  ...Oh, I've forgot to paint ailerons with grey. エルロン塗り忘れた・・・  whitened lowerside of the British Phantom is pretty cool! Especially under the nose. 塗り分けが無駄にカッコ良い。特に機首。なにこれ無駄にカッコイイ。 I have not yet worked with the cockpit frame.  I will close the canopy so pilot and observer would not be able to  escape from their aircraft. コクピット周辺は放置していたのでこれから作業します。 パイロットとオブザーバーをつくって閉じ込める予定。

The British Phantom FG Mk.I  3

イメージ
The Brit Phantom over all has been sanded . But not yet ready to paint  dark sea grey. ブリットファントムの続きです。 なんとなくサンディングしてテイクオフ ポジションっぽくなりました。 もうちょっと調整してからエクストラダークシーグレイです。 Flaps of wings are... not perfect but I have done what I wanted to do. 主翼フラップは・・・まあ真剣にやったら終わらないので今の自分のスキル だったらこの程度です。 Vertical fin have now some extra details. Thin air guide of air inlet  at the bottom and pitot tube are sharpend. 垂直尾翼はいい感じになったと思います。 ピトー管とエアインレットの工作、できました。 I am quite happy now. ちょっとうれしい。 Now I have found a serious issue, at the pivot(?) of the horizontal tail. しかし、おそろしい問題を発見しました。 The Hasegawa kit (this sure is) have holes at both port side and starboard side of the horizontal tail... ハセガワキット(コレ)のファントムの水平尾翼取り付け穴ですが・・・ but they seem to be ..just holes for glueing the horizontal tail for LEVEL POSITION ONLY, not to move horizontal tail using this hole as pivot . I cannot use this hole as glueing point when I move horizontal tail upward

The British Phantom FG Mk.I  2

イメージ
During catapult launching of FAA's Phantom, front and rear flaps are  drooped down for take off.  This time I want the Phantom to have stretched front under carriage  and the plane must be leaned back. So, I have to cut all movable flaps  and re-glue them to be drooped.  英海軍ファントムの発進時の姿勢を再現するため動翼をすべて切り離して 再度接着しました。単に前脚を延ばしただけでは発艦できないですし。 Damn, those plastic wings were so hard and thick enough to cut away! しかし、ハセガワキットのプラは堅く翼は厚く 切り離すのが至難の業でした。 (しかもある程度組んでしまってたので作業がやりにくいのなんの) after all, movable planes are properly fixed to reproduce  catapult launching British Phantom. これでまあなんとか発艦時を再現できるかな。

The British Phantom FG Mk.I  1

イメージ
I have started building Hasegawa's RAF British Phantom since this summer 2017.  Although I hoped to make a lovely penguin-like coloured Fleet Air Arm's Phantom,  there were no decals for FAA Phantoms. So I had started building my Brit Phantom  for the RAF scheme with decal in kit . Only a week ago, I finally discovered a fine brand new FAA Phantom decal!  Does anybody know the British company RAM Models ?  The company provides the adorable decal! ハンドルネームのブリティッシュファントムの制作をしています。 RN仕様にしたかったのが、キットはハセガワのRAF仕様のものでした。 RN(FAA)のデカールがなかなか見当たらなくて諦めかけていましたが RAM Models さんの存在を知り、良い感じのデカールが入手できました。 The RAM Models sent me a brand new decal. It sure costs a bit high enough,  but the quality of printings are excellent.  良い感じの印刷です。 Now I can make the quarter inch scale FAA British Phantom. I love the colours  of FAA fighters.  フリートエアアームのペンギンカラー(濃いグレイ+白)は素敵です。 White under fuselage and undercaridges!  とりあえず胴体下面などを白くしました。RAF用に淡グレイに塗って あったのですが塗

模型クラブの例会、ふたたび

イメージ
転職してなかなか行けなかった模型クラブの例会、久しぶりに 行くことが出来ました。例によって自分の作品は全くないので あしからず。 この複葉機と無人機は双方とも1/48スケールです。 出現した時期があまりに違う、とはいえこうやって並べることが 出来ることが、まさしくスケールモデルの楽しみです。 完全スクラッチビルドの機体、こちらも1/48スケールです。 プラ板からの製作だそうです。綺麗に仕上がっていました。 秋の展示会のお題目、ファントムです。自分も作っていますが この塗装見ると、とにかく精進したいなあと思います。 造形村1/48ファントムの泣き所、胴体後部を見事に改修しきっています。 作られた方は、機首も改修したいともことですが。 そしてその方からニューポールのキット(これは1/72)を いただいてしまいました。 つくります。

ジオラマを仕立てる時に、思うこと

イメージ
コンテストに出品するなら少なくとも目立ちたい!あわよくば 賞を頂きたい、それが出品者の偽らざる気持ちというか 使命!だと思います。綺麗事を言ってても始まらない。 たまたま運良く受賞を重ねただけではありますが、こんな 自分が常に考えている決まりは下記の通りです。 ●入手しやすいキットを使う これは悪い例(笑) 私の自慢の積みキット「トライマスター1/48ドイツ機全17機(×複数あり)」 は、その道の同志に対しては大いに自慢できると思っています。 が、コンテストを眺める一般人には何のことかさっぱり理解できません。 見る人がもしかしたら「自分でも作ってみたいかも」と思った時に 入手しやすいキットなら、すぐ真似てもらえます。 絶版キットで入手困難だった場合、ガッカリされて二度と近づいてもらえません。 ●それなりに見栄え良く、例えば喫茶店の入り口に置いても 映える作品を目指す AFVのジオラマで、バリバリの戦闘シーンとかありますが、正直観る人を 選びます。 戦争反対を声高に言うつもりはないですし、私自身AFVモデルだって好きです。 しかし、ここは世間の女子供様方に歩み寄りが必要だと思います。 「オシャレ」を目指しましょう。 世界の半分は女性のものです。女性を味方につけることは非常に大切です。 ●できるだけ人物(フィギュア)を入れて、ジオラマ世界をイキイキとさせる ろうがんず杯などで気になったのが、「乗り物などはきっちり作るけど 人形が全く無い、あっても書き割りや単色シルエットのもの」が多く見受け られたことです。 確かにフィギュアの塗装、メッチャ面倒です。あと、上手くいかないと 人前に出すのが恥ずかしいです。 でも、書き割りよりは、せっかくタミヤさんやいろんなメーカーさんから キチンとしたスケールフィギュアが出ているんだから、作って塗って、 作品に加えたほうがいいです。 ・・第1回ろうがんず杯の私の作品に乗せていた「赤城さんコスプレ女子高生」、 あれ、ウチでは「泥人形」と呼ばれていました。正直、出来に満足は 出来ませんでした。顔塗りとか造形が難しかった! ちなみに第2回の時にも空母上に乗せていた人形があったんですが それらは「秘宝館」と呼ばれました。少しだけラン